Open topic with navigation
Video setup
Offline report settings
Setting sagittal and frontal video
If you are using video cameras, you should set the correct suffix for the frontal and sagittal video cameras. Follow these steps to find the suffixes:
- After setting up the cameras, capture a test file. Save the file.
-
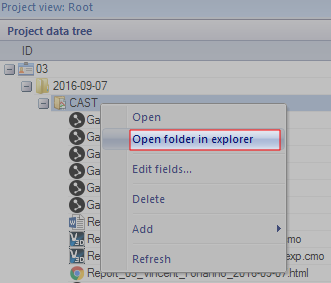
Open the folder containing the file by right-clicking it in the Project data tree:
-
Take note of the video file name suffix for the .avi files. Play the videos if you are unsure which video is frontal and sagittal:

-
Once you know suffixes open [Project folder]\Settings\User Settings.paf in a text editor.
Add or edit following lines and set the suffixes to match your video file suffixes:
Frontal video: '_Oqus_13_15519.avi'
Sagittal video: '_Oqus_14_13093.avi'
Note that if you set the suffixes to default, the first and second video file found will be used as the sagittal and frontal video respectively:
Frontal video: 'default'
Sagittal video: 'default'
Setting up video time offsets
If your video camera is not frame synchronized, it can help to set a time offset for your camera. This is done by right clicking your live video in QTM.
At this time, this module cannot read the time offset you set in QTM, therefore, to get properly offset video in the web report you must also set the time offset in the User Settings.paf file.
The workflow is as follows:
- Figure out the best time offset for your camera. Set it in QTM:
2D > Right click video > Set time offset.
-
Open [Project folder]\Settings\User Settings.paf in a text editor.
Add or edit the time offset settings with the same values set in step 1. Example: if your optimal time offset is 0.3 seconds for both cameras, set them both to 0.3.
Sagittal video offset: 0.3
Frontal video offset: 0.3
Online report
Similarly to offline report, videos can be adjusted in online report as well. Open [Project folder]\Settings\User Settings.paf in a text editor.
- Add or edit following line to set output video quality to values between 1 and 100 (the higher the value, the better quality and larger file size):
Video quality: 50
- Videos can be grouped using following settings:
Cameras:
  Include only defined cameras: True
  12345:
    Group: Sagittal
  54321:
    Group: Frontal
Number is serial number of camera the settings is being applied to. Camera serial number is part of .avi file name (see above in offline settings).
Group is an optional setting. All cameras with the same group will be grouped together.
By default all videos will be shown in the report. If Include only defined cameras is set to True, only camera whose serial number is specified will be shown in the report.
Word and PDF reports
When generating Word report or PDF report, it is possible to export all .avi files to .mp4 format. Open [Project folder]\Settings\User Settings.paf in a text editor and add or edit following line:
Export mp4 for Word and PDF: True
Example of User Settings.paf
Video quality: 50
Export mp4 for Word and PDF: True
Cameras:
  Include only defined cameras: True
  12345:
    Group: Sagittal
  54321:
    Group: Frontal
Web report language: en
Sagittal video: default
Frontal video: default
Sagittal video offset: 0
Frontal video offset: 0
Please note that User Settings.paf uses YAML syntax. It is important to keep the hierarchy of the settings as shown in the example. The hierarchy is defined by whitespaces: first level = no whitespaces, second level = two whitespaces, third level = four whitespace etc. as shown by the dots below:
Video quality: 50
Cameras:
··Include only defined cameras: False
EMG setup
Set up the channel names according to “Appendix A - EMG”.